- به وبلاگ خود خوش امدید
- Analysis of A Practical CWDM System Deployment Case
- Why Not Use EDFA Amplifier in Long CATV Network?
- Why Not Using DWDM Technology to Build Your Network?
- Optical Transponder—an Important Component in WDM System
- How to Build an Economical Long-haul 500Gbps Metro Network?
- Fiber Optical Communication
- Why Do We Need Optical Transponder (O-E-O)?
- CWDM Technology—Economically Saving Fibers for Your Network
- Confused About Loss in the Long Haul DWDM Network?

آخرین مطالب
امکانات وب
Are the Ethernet patch cables you purchase from the local or online stores always at the proper length? Or not so suitable for your network because they are too long or too short that donrsquo;t meet your expectations? Have you ever considered making the improper Ethernet patch cable into a suitable one by yourself, so that you can deploy your network by using you own Ethernet patch cable and save a lot of money, time and space? In fact, terminating the Ethernet patch cables is not so difficult but very useful for fast network deployment, which will be presented in the post. Meanwhile, there are several important things you should take into consideration before making the Ethernet patch cable termination, which will be also illustrated in details. Hope these information will guide you to make your own Ethernet patch cable and then deploy your Ethernet network in a very fast, smooth and cost effective manner.
Selecting a Proper Ethernet Patch Cable
Before making the Ethernet patch cable termination, you should choose one kind of Ethernet patch cable which is most suitable for your network, since there are various kinds of Ethernet patch cables available on the market, such as, cat5, cat5e, cat6, cat6a, cat7, etc. Considering that cat5e, cat6 and cat7 patch cable are the most commonly used ones at present, both of which will be introduced the following text.
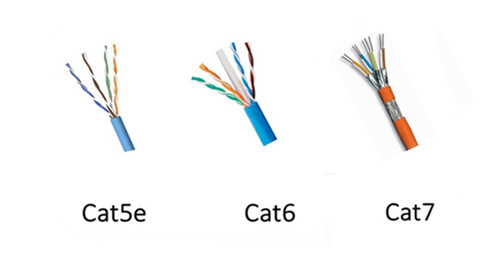
As an upgrade version of cat5 patch cable, cat5e patch cable has the ability to support gigabit speed, allowing for a faster, more reliable and steady network. It is much commonly used in home and office applications. As for cat6 patch cable, it is an enhanced version of cat5e patch cable that has much more sophisticated structure, as shown in the above figure. It is an ideal solution to face future-proof network that supports the transmission speed up to 10 gigabit with a long transmission distance. In contrast to cat5e and cat6 patch cable, cat7 patch cable is a kind of shielded Ethernet cable that has a great improvement in the capacity and reliability. It is more expensive since it has been the most durable and longer-lifespan Ethernet patch cable at present. As for the structural differences among cat5e, cat6 and cat7 patch cable, it is very easy to learn from the above figure.
Choosing a Proper Wiring Scheme
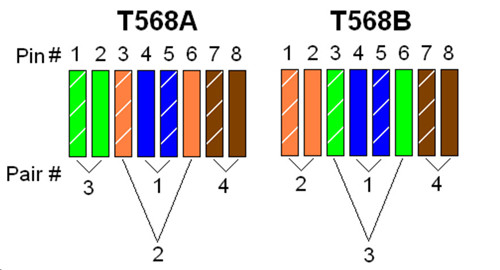
In general, there are two common wiring schemes, T568A and T568B, which are designed to specify the arrangement of the colored wires for terminating the Ethernet patch cable. Thatrsquo;s to say, if you want to terminate your cable, you should arrange the colored wires in a correct order according to the standard of T568A or T568B, as shown in the following figure. As for their applications, T568A is always applied in home-networking connections, while T568B is strongly suggested for the preexisting residential network wiring or other similar projects.
Terminating the Ethernet Patch Cable You Need
There are ten detailed steps to make the Ethernet patch cable you need at an exact length, which will be presented below. Terminating the cable you need according to the following step-by- step procedures can ensure the performance of the DIY cable and the stability of your network.
- Prepare the essential tools and materials for the cable termination, including some RJ45 connectors, a pair of wire scissors or wire strippers, a spool of Ethernet cable, a RJ45 crimping tool and a network cable tester.
- Use the wire scissors or wire strippers to cut the Ethernet patch cable you need into a desirable one with the exact length. Besides, yoursquo;d better to add two or three inches extra no matter how long you want the Ethernet patch cable to be, for the sake of messing up.
- Utilize the RJ45 crimping tool to shove the sheath of the cable (about 1 inch) from the end of the cable into the stripper, and lightly squeeze the crimping tool.
- When the razors slice of the crimping tool pass through the cable jacket, you should twist the cable and pop off the cut end of jacket.
- Once the jacket is stripped, you can see four twisted pairs of wires with four different colors. You should separate these four pairs of wires into eight individual wires and rearrange them into sequence according to the color order in T568A or T568B.
- Cut the tips of the wires in order to match with the RJ45 connector. Then guide the wires into the plug and slip them into their own channels. The ends of the wires should reach as far as possible toward the front edge of the plug.
- Double check and confirm whether the wires are in sequence according to the right order or not, avoiding error connection.
- Insert the plug into the crimping slot of the crimping tool and squeeze the crimping tool to make the pins inside the plug into the wires and fasten the plug onto the cable. Hence, the RJ45 connector can be a permanent part of the new cable.
- As for the other end of the cable, just terminate it in the same way, so that you can finish the whole termination process for your own Ethernet patch cable.
- Test the cable by a network cable tester to confirm that it really works. In addition, if it doesnrsquo;t work, you are highly suggested to check the color order of the wires first.
Conclusion
Before making your own Ethernet patch cable, you should choose a proper Ethernet patch cable and a wiring scheme according to your network requires. As for the process of making the cable with an exact length, it is not so difficult as you consider, but easy and fast. The only thing that deserves a bit of attention is to be careful in the whole termination process, so that the Ethernet patch cable can be made at a proper length and work with your network like a charm.
Fiber Optical Communication...ما را در سایت Fiber Optical Communication دنبال می کنید
برچسب : نویسنده : afiberopticalcom1 بازدید : 36